CLICK HERE FOR THOUSANDS OF FREE BLOGGER TEMPLATES »

Monday, January 16, 2012

One of my Fav projects...


A long long time ago...way back in the day...many moons ago there was a time that I wrote sweet little silly letters to my sweety. We spent a summer apart in college and I must have been out of my mind (in love) and I think I wrote him everyday....and I actually got a few that he wrote back. We are not a "romantic" couple by any means so these letters are quite a testement of "young love" ha ha!!! After we got married I wanted to do something fun with the letters so I thought of making this. I took all my letters and photocopied them, let them sit in a little tea for a couple hours to tint them just the right old agey colour, dried them out and then wripped them up!! I bought a big foam board and then just started modpodging away. I decided really early on not to look for perfection...because from the start it wasn't looking as I had hoped....there were lots of wrinkles but it sort of added to the effect of it all in in the end. Pictures do not do it justice. If I were to do it over again..I would have bought a HUGE canvas for this project as it would have been a little sturdier. Besides our letters, I added some pages from our wedding vows and some other silly little poems and stuff. I keep it in our bedroom, hidden away from any snoopy friends who want to try to read some of those cheesy letters we wrote each other...afterall...we have a reputation to uphold!! ha ha!! Anyways...my fav creation of all time for the sentimental value alone. There..I do have a heart!!!

My best decorating friend...Blank Canvas....


If it hasn't been established yet...I am very cheap when it comes to certain things. I don't like spending money on something I think I can make myself (hence the couple of years of making purses). I'm not too concerned about it looking homemade...so voila...half the stuff in my house I've found a way to make it a little big cheaper.

I love pictures...specially of my kids. I love putting holes in my wall....but I don't like paying for prints and I don't like paying for frames. I will go to the extreme of getting cheap frames from yard sales and just spraypainting them. So my wall of photos was done for a very little amount of money!! If you look close you will see that isn't high end...but most people walk in and like it...and I pray they don't get too close!! ha ha I wait till there is a good sale at Joannes on Canvas...buy a couple big ones and then get crafty. I like to put canvas on canvas for that nice two dimensional look. Here is one that always gets noticed at my house. Just a little paint on the edeges, I used velcro to put the two canvass on the larger one. I've experimented quite a bit with putting pictures on the canvas and I like to just place a tad bit of mod podge in each corner and it tends to work pretty good. I had some little tin tiles that didn't have a home and before I put everything together I took a brown crayon put the tile underneath the canvas...pressed it up and then rubbed with crayon here and there to get a nice little design on the front of the canvas. It is very subtle but gives a little texture.

Tick Tock


When we first moved into our house 6 years ago...the big clocks were "in style" and I really wanted one with all the new wall space I had!!! However, my cheapo self couldn't bare to part with my money. I figured I could make one pretty easy. It was def a work in progress...but I went to home depot...got a $10 round precut board and took a look at some tiles in the tile section (I origianlly thought I wanted rocks for the minutes but found these tiles instead). Came home...got out all my old paints...had some crackle paint and just started experimenting. This is how it turned out. I just used Gorilla glue to glue on the tiles. This was made before the days of all the fabulous decals...the numbers would have been much better if I hadn't done them by hand with a homemade stencil. I also had to buy the hands from a specialty store online so it would keep the correct time. I think the clock kit itself only cost about $7. So I figured I saved myself about 50 dollars making this myself.

3D PaperBalls


So I found an easy how to to make these fun paper balls. Since I'm in love with scrapbook paper..but don't scrapbook...these make great ornaments. I think I will keep them out even after Xmas...they look great just for everyday decorating!!


Snowflakes Galore

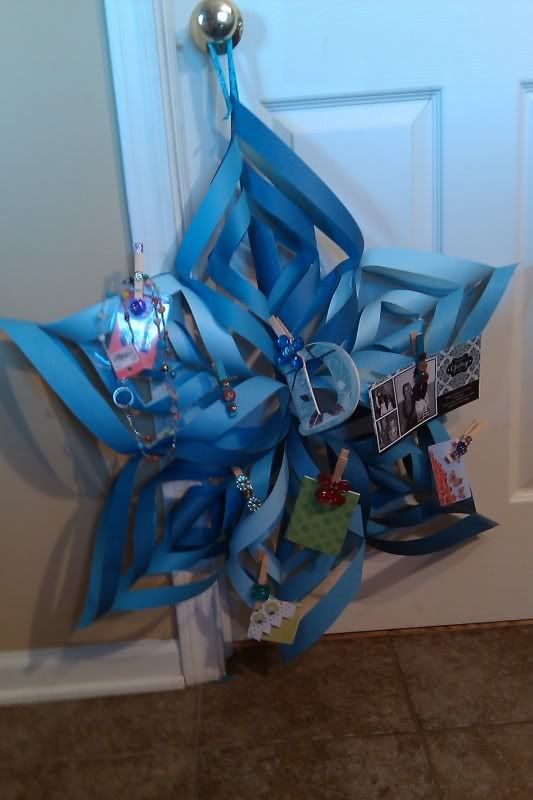
Photobucket Pictures, Images and Photos I never know what to get the teachers for gifts..so we opted for a gift card. But over the weekend Madeline and I got crafty and made this snowflake so we could clip the gift card and a few other items to it withour handmade "diva clothespins". I always get so many compliments on these when I put them up for Christmas. So easy to make...and I got the instructions from HERE. I found the best looking ones are made with the two sided scrapbook paper...they look so pretty!!!


New obsession....

So my creative side has taken a little time out for the past year or so while I focused on all the other things of life. Now that ive been introduced to pinterest....I'm in big trouble. My kids may have to hide this iPad lest I forget their names. The best part however is now I might have two partners in crime...if I can drag them in with me. I have a zillion ideas and no wall space left. AGGGHHHH. Shame shame. Here are a couple things I've worked on...and some old ones since it is fun to share.